This article describes how to restore kwiklook either via the automatic method using kwiklook Backup or manual method using Microsoft SQL Server Management Studio and WinZip.
Automatic Method:
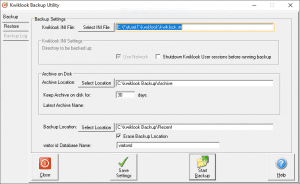
The kwiklook database and program files can be backed up using the kwiklook Backup app that is installed with kwiklook on the kwiklook master server. The default location of the kwiklook Backup app is in ‘C:\kwiklook Backup’.
Login to the kwiklook master server as an administrator.
The desktop should contain a shortcut to running the kwiklook Backup Administrator app that allows changing the settings of the kwiklook Backup app. Run the kwiklook Backup Administrator app. If the shortcut doesn’t exist then the kwiklook Backup Administrator app can be run from the kwiklook Backup installation folder: ‘C:\kwiklook Backup\kbadmin.exe’.
The kwiklook Backup Administrator app should be now open:
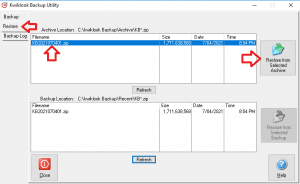
Click the ‘Restore’ tab.
Choose a backup set from the list to restore then click the ‘Restore from Selected Archive’ button:
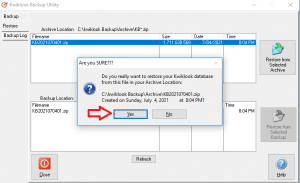
Click the ‘Yes’ button:
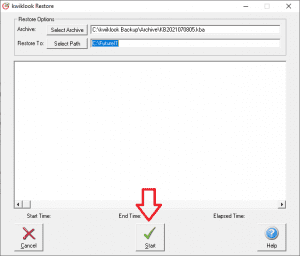
The ‘kwiklook Restore’ window will appear. Make sure the ‘Restore To’ path the the parent folder of the ‘kwiklook’ folder, I.E.: By default this path it ‘C:\FutureIT’. Click the ‘Start’ button and wait for the process to finish:
A success message will appear when the restore is complete. Press ‘Ok’ then ‘Close’. If an error message appears instead, please contact the kwiklook Support Team for further advice.
Please note: For kwiklook backup archives that are larger than 2gb in size, please use a different zip application such as 7-Zip or WinRAR. The kwiklook Backup application uses 7-Zip which can be downloaded here: www.7-Zip.org
Locate the kwiklook backup archive file to be used to restore kwiklook with. This should be a *.zip or *.kba file that includes a copy of the kwiklook master installation and database backups.
Unzip the kwiklook backup archive file to the root kwiklook folder, overwriting all existing files. The default root kwiklook folder is: ‘C:\FutureIT’.
If using a *.kba kwiklook backup archive file, this file can be unzipped using a 3rd party zip application such as 7-Zip or WinRAR.
Navigate to the ‘.\kwiklook\Database\Backup’ folder:
Copy the kwiklook database backup file ‘kwiklook.bak’ to the ‘.\kwiklook\Setup’ folder, overwriting any existing file.
If the visitor id database backup file exists ‘visitorid.bak’, copy this file to the ‘C:\ProgramData\visitorid\Setup’ folder, overwriting any existing file.
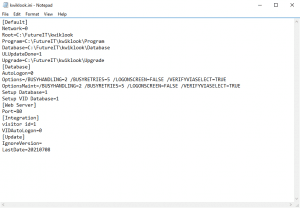
Navigate to the ‘.\kwiklook’ folder and double click the ‘kwiklook.ini’ file to edit with Notepad:
In the ‘[Database]’ section change the line ‘AutoLogon=1’ to ‘AutoLogon=0’ (zero).
In the ‘[Database]’ section add these 2 lines:
Setup Database=1
Setup VID Database=1
In the ‘[Integration]’ section change the line ‘VIDAutoLogon=1’ to ‘VIDAutoLogon=0’ (zero).
Save and close the ‘kwiklook.ini’ file.
Navigate to the ‘C:\Users\Public\Documents\visitorid’ folder and double click the ‘visitorid.ini’ file to edit with Notepad:
In the ‘[Database]’ section change the line ‘AutoLogon=1’ to ‘AutoLogon=0’ (zero).
In the ‘[Database]’ section change the line ‘Setup Database=x’ to ‘Setup Database=1’ (one).
Save and close the ‘visitorid.ini’ file.
Run ‘kwiklook’ from the shortcut on the desktop.
The ‘kwiklook Database Connection Parameters’ window will appear. Enter the correct details to connect to the kwiklook database, then click ‘Connect’.
The ‘visitor id Database Connection Parameters’ window will appear. Enter the correct details to connect to the visitor id database, then click ‘Connect’.
The ‘visitor id Database Connection Parameters’ window may appear a 2nd time. Enter the correct details to connect to the visitor id database, then click ‘Connect’.
kwiklook will now restore the databases. If the restore is successful then the kwiklook login screen will appear. kwiklook has been restored successfully.
If an error message appears during the database restore, please make a note or take a screen shot of the error and contact the kwiklook Support Team for further advice.
Manually restoring the databases:
In some cases the databases may need to be restored manually using Microsoft SQL Server Management Studio. Here are the instructions on how to restore the kwiklook and visitor id databases manually.
Navigate to the ‘.\kwiklook’ folder and double click the ‘kwiklook.ini’ file to edit with Notepad:
In the ‘[Database]’ section change the line ‘AutoLogon=1’ to ‘AutoLogon=0’ (zero).
In the ‘[Database]’ section remove these 2 lines:
Setup Database=1
Setup VID Database=1
In the ‘[Integration]’ section change the line ‘VIDAutoLogon=1’ to ‘VIDAutoLogon=0’ (zero).
Save and close the ‘kwiklook.ini’ file.
Navigate to the ‘C:\Users\Public\Documents\visitorid’ folder and double click the ‘visitorid.ini’ file to edit with Notepad:
In the ‘[Database]’ section change the line ‘AutoLogon=1’ to ‘AutoLogon=0’ (zero).
In the ‘[Database]’ section change the line ‘Setup Database=1’ to ‘Setup Database=2’ (two).
Save and close the ‘visitorid.ini’ file.
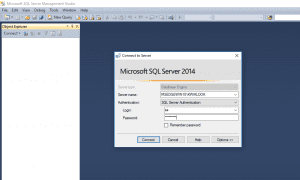
Open Microsoft SQL Server Management Studio and login:
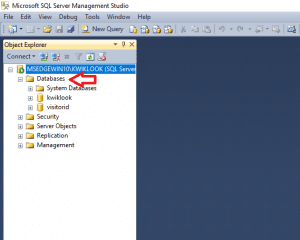
Expand the ‘Databases’ menu in the left pane:
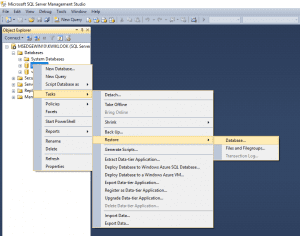
Right click the ‘kwiklook’ database and click ‘Tasks > Restore > Database…’:
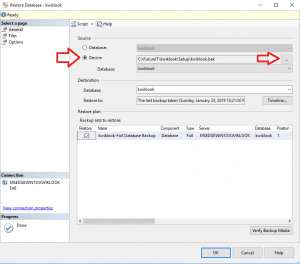
In the ‘Source’ area click the ‘Device’ option, then click the elipses button and select the ‘kwiklook.bak’ file to be restored. If you completed step 4 in the above instructions the file will be located at ‘.\kwiklook\Setup\kwiklook.bak’. If not then the file will be located at ‘.\kwiklook\Database\Backup\kwiklook.bak’:
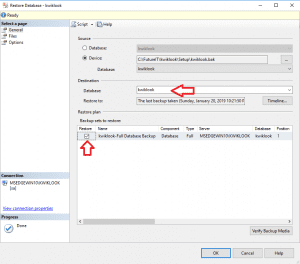
Make sure the ‘Destination > Database’ is set to the ‘kwiklook’ database:
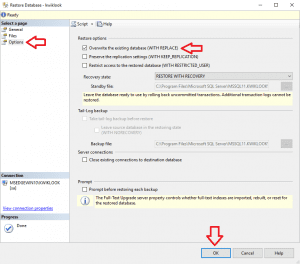
Click the ‘Options’ menu item in the left pane.
In the ‘Restore Options’ area tick the ‘Overwrite the existing database (WITH REPLACE)’ option:
Click the ‘OK’ button on the bottom right of the window to start the restore process. This should restore the kwiklook database successfully. If not then please contact the kwiklook Support Team for further advice:
Right click the ‘visitorid’ database and click ‘Tasks > Restore > Database…’:
In the ‘Source’ area click the ‘Device’ option, then click the elipses button and select the ‘visitorid.bak’ file to be restored. If you completed step 4 in the above instructions the file will be located at ‘C:\ProgramData\visitorid\Setup\visitorid.bak’. If not then the file will be located at ‘.\kwiklook\Database\Backup\visitorid.bak’:
Make sure the ‘Destination > Database’ is set to the ‘visitorid’ database:
Click the ‘Options’ menu item in the left pane:
In the ‘Restore Options’ area tick the ‘Overwrite the existing database (WITH REPLACE)’ option:
Click the ‘OK’ button on the bottom right of the window to start the restore process. This should restore the kwiklook database successfully. If not then please contact the kwiklook Support Team for further advice:
Exit Microsoft SQL Server Management Studio.
Continue from step 8 in the above instructions.
Was this post helpful?
Let us know if you liked the post. That’s the only way we can improve.