This article explains how to setup, configure and use kwiklook Real-Time Rounds.
Please Note: These instructions require kwiklook v7.0 and above.
Description
kwiklook Real-Time Rounds allows Staff and Service Providers to be tracked in real-time using any web-enabled device that has a camera, such as a smart phone or tablet. Users can then view the Staff and Service Providers being tracked in real-time via kwiklook Online. kwiklook Real-Time Rounds uses the PocketBase database which ships with kwiklook v7.0 and above. Please follow the instructions below to setup and configure kwiklook Real-Time Rounds.
Setup the Area/Level Maps
Inside the kwiklook desktop app, click the ‘Admin’ module in the main menu, then click ‘Locations’.
Expand the Locations to show the ‘Area/Level’ nodes.
Double click on an ‘Area/Level’ record to edit it.
Click the ‘Load’ button next to ‘Image File Name’ and select an image file to upload as a map for the Area/Level.
Click ‘Save’.
Repeat steps 4 to 6 for all other Area/Levels.
Make Sure the Staff and/or Service Provider Staff have Photos
How to add photos to Staff.
How to add photos to Service Provider Staff.
Setup the Points, Point Groups and Rounds
Inside the kwiklook desktop app, click the ‘Rounds’ module in the main menu.
On the top menu bar, click ‘File > Options > Rounds’.
In the ‘General’ tab under ‘Equipment > Equipment Type’, choose ‘QR Codes’.
Click ‘Save’.
Add the Points to the Point Inventory: How to Add Points to the Point Inventory.
Add the Points to one or more Point Groups: How to Add Points to Point Groups.
Add the Point Groups to one or more Rounds: How to Add Point Groups to Rounds.
Print the QR Code for each Point in the Point Inventory to a supported label printer and then stick the labels around the site in areas that are easy to be reached by a smart phone/tablet camera:
Open the Point Inventory by clicking on the top menu bar ‘Records > Point Inventory’.
Edit a Point you want to print by double clicking the Point record.
Click the ‘Print QR Code’ button. This will automatically find any supported label printer and will print the QR Code.
Click the ‘Save’ button to close the Point record.
Repeat for each Point you want to print.
Setting Up the PocketBase Database
The PocketBase database is setup using the kwiklook Online web server app. Depending on your setup this may be on a different server than your kwiklook master installation or MSSQL server.
Exit the kwiklook Online service if it is running from Windows Task Manager.
Open Windows File Explorer and navigate to the folder that contains the kwiklook Online web server executable. The default location is: C:\FutureIT\kwiklook\WebServer
Double click the ‘klws.exe’ file.
In the kwiklook Online window, click the ‘Settings > Rounds’ tab.
This tab contains the settings for the PocketBase database. The default settings for ‘URL’ and ‘Port’ usually do not need to be changed and should only be changed if another web server is running on the same port. The default settings for PocketBase are:
Admin URL: http://127.0.0.1:8090/_/
URL: http://127.0.0.1
Port: 8090
Tick the ‘Run PocketBase server on startup’ checkbox and click the ‘Save’ button.
Click the ‘Close’ button and restart the kwiklook Online web server by double clicking the ‘klws.exe’ file.
Click the ‘Settings > Rounds’ tab.
Click the ‘PocketBase Admin URL’ link. This will open the default internet browser to the PocketBase login page.
If the PocketBase login page does not appear then kwiklook Online has failed to start the PocketBase server. Please contact the kwiklook Support Team for further advice.
In the PocketBase login page, enter an email address and password to create an admin login. Make a note of these details in your password management system.
Once the PocketBase admin login is created you can close the internet browser window.
Back in the kwiklook Online web server app, enter your newly created admin login details into the ‘PocketBase Username’ and ‘PocketBase Password’ fields.
Click the ‘Save’ button.
Click the ‘Close’ button and restart the kwiklook Online web server by double clicking the ‘klws.exe’ file.
Open an internet browser and navigate to the kwiklook Online login page.
Login to kwiklook Online.
In the main menu, choose ‘Tours > Real-Time Rounds Tracking’. The initial page load will create the required database.
Back in the kwiklook Online web server app, click the ‘Settings > Rounds’ tab.
Click the ‘PocketBase Admin URL’ link. This will open the default internet browser to the PocketBase login page.
Login to PocketBase using the username and password created in step 10.
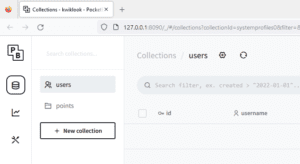
If the setup is successful you will see two Collections called ‘users’ and ‘points’ as per this image:
If these Collections do not appear then please contact the kwiklook Support Team for further advice.
Close the internet browser window.
Click the ‘Close’ button and restart kwiklook Online as a service.
Starting a Round via kwiklook
Inside the kwiklook desktop app, click the ‘Rounds’ module in the main menu, then click ‘Start Round’.
Choose the ‘Round Operator’, either a Staff Member or Service Provider Staff Member.
Choose the ‘Round Type’, either a Round Profile or a Freelance Round.
Enter a Comment if required.
Click the ‘Start’ button.
Starting a Round via kwiklook Online
Login to kwiklook Online.
Click ‘Rounds > Start Round’.
Choose the ‘Round Type’, either a Round Profile or a Freelance Round.
Enter a Comment if required.
Click the ‘Save’ button.
Finishing a Round via kwiklook
Inside the kwiklook desktop app, click the ‘Rounds’ module in the main menu, then click ‘Round Log’.
Select the Round to be finished by clicking the record once.
Click the ‘Finish Round’ button.
Finishing a Round via kwiklook Online
If logged in to kwiklook <i>Online</i>: Click ‘Rounds > Finish Round’.
If logged out of kwiklook <i>Online</i>: Click ‘Finish Round’.
Viewing the Real-Time Rounds
Open an internet browser and login to kwiklook <i>Online</i>.
In the main menu, choose ‘Rounds > Real-Time Rounds Tracking’.
The ‘Real-Time Rounds Tracking’ page will show each Area/Level map, with each Point marked and each user (with the photo) with a current Round in-progress.
How to Read a Point
If logged in to kwiklook <i>Online</i>:
Click ‘Rounds > Scan Round Point’.
Hold the device camera to the QR Code until the QR Code is scanned.
If logged out of kwiklook <i>Online</i>:
Click ‘Scan Round Point’.
Hold the device camera to the QR Code until the QR Code is scanned.
Was this post helpful?
Let us know if you liked the post. That’s the only way we can improve.